Welcome !

Howdy !

I’m currently pursuing my Graduate studies in Dynamics & Control at The Department of Aerospace Engineering, Texas A&M University.

alt text

Feel free to checkout and leave comments on the articles I post here. I also write on Quora. If you’re on Quora as well, you can follow my handle here.

Developing software for your raspberry pi remotely !

Howdy y’all !

Recently i’ve been tinkering a lot with my Raspberry Pi. For my master’s Thesis , i’m building a Tensegrity manipulator robot for which i’m using a Raspberry Pi to perform the controls. My controller algorithm needs to be developed in python. It can be tedious to setup the raspberry pi with a monitor, keyboard setup and develop software in that environment. So, to circumvent this problem, I looked into remote development of software in Raspberry Pi. To my surprise, PyCharm had a feature in it to do this operation.

It is done by setting up a remote interpreter in your PyCharm environment and by accessing the files in the raspberry pi’s home folder using ssh communication.

For this, my setup was the following :

I interconnected the Raspberry Pi to my laptop using an ethernet cable and setup a local network with it. The ip address was let’s say 192.168.1.17 (You can get the actual address by typing ifconfig in your raspberry pi’s terminal or ipconfig in your windows cmd.) .

Now,  open Pycharm and follow the steps :

1) File > NewProject
2) Pure Python > select the Wrench icon > add remote > type the ssh credentials
3) Project interpreter path > /usr/bin/python (location of python 2.7 interpreter in linux)

You’re good to go ! PyCharm will setup the environment for you, importing the dependencies. Create a new python file main.py, type print “hello world” and execute using Ctrl+Shift+F10 you should see the code compiling and executing in the raspberry pi.

If you think this tutorial helped you, follow my blog for more such news ! 🙂

Installing Robot Operating System on a Raspberry Pi.

Prerequisites : Basics of Linux and terminal workaround.

Setup your raspberry pi. If you can hook it up with a monitor, keyboard and mouse, then good. Otherwise, try to ssh into your pi from a common network and then access the terminal (You actually don’t need a monitor keyboard and mouse if you can ssh into your pi. You can stream the desktop to your laptop or pc connected to the same network using VNC but that’s another tutorial for someday).

For this tutorial, i’m using Raspbian Jessie (Latest as of writing this article). Start the terminal and follow the commands :

Raspbain is a debian based system. The from-source installation procedure is given clearly in their website. But there can be a few pitfalls when installing it first as a newbie.


$ sudo apt-get install python-pip
$ sudo pip install --upgrade setuptools
$ sudo pip install -U rosdep rosinstall_generator wstool rosinstall
$ sudo rosdep init
$ rosdep update
$ mkdir ~/ros_catkin_ws
$ cd ~/ros_catkin_ws
$ rosinstall_generator desktop --rosdistro kinetic --deps --wet-only --tar > kinetic-desktop-wet.rosinstall
$ wstool init -j8 src kinetic-desktop-wet.rosinstall
$ rosdep install --from-paths src --ignore-src --rosdistro kinetic -y
$ ./src/catkin/bin/catkin_make_isolated --install -DCMAKE_BUILD_TYPE=Release -j1
$ source ~/ros_catkin_ws/install_isolated/setup.bash

Follow these set of commands to download and install the ros-desktop package into a catkin workspace. Now, to make things easy, instead of sourcing the setup.bash file everytime you loginto your account, you can add it to the bashrc file.
$ gedit ~/.bashrc

add this line to the end of your bashrc file :

$ source ~/ros_catkin_ws/install_isolated/setup.bash

Goodluck playing with ROS on your raspberry pi ! 🙂

A basic introduction to Linux.

Image result for linux
What is all the buzz about Linux ? What is it ? How do I switch from Windows to Linux ? Are some of the questions I get from some of my juniors from my undergraduate university and some peers who are not from electronics background. I have written this article to address their questions and as the first introductory node into reaching higher dimensions of learning about computer systems. Lets get started :

Linux is a family of free and open-source operating systems built around the linux kernel. It was released in the year 1991 by Linus Torvalds. Since then, it was developed further by volunteers and started to be used with software from the GNU project ( a suite of programs that form a complete operating system). It still continues to be developed by volunteers and is available to be downloaded and used for free.

The linux kernel : A kernel is a software that serves as an interface between the hardware and the user. A user sends commands to the kernel, the kernel executes it using the hardware and publishes results to the user. Linux is different from windows basically in the fact that some linux distributions do not come with a nice GUI for a user feel comfortable with while  interacting with his/her machine. That said, there are other flavours(distributions) of Linux that provide a nice GUI to make things simpler.

Some of the flavours I have tried are Ubuntu, Fedora and Raspbian. I personally prefer using Ubuntu in my PC and raspbian for running my Raspberry Pi. So, if you are reading this article from your computer and would like to install and try linux, I would suggest installing the latest version of ubuntu 17.10 (as of when writing this article).

Follow this youtube link for installing ubuntu : Install Ubuntu

Once you have Ubuntu installed, it’s time to play with the bash shell. It’s similar to command prompt in windows. You can evoke the terminal by pressing Ctrl+Alt+T.
Out pops a window which is popularly known as the linux terminal. It lets you type bash commands that interacts with the hardware to publish messages and execute structured commands.

Follow this youtube link to learn some basic commands : Terminal commands.
The above video will introduce you to the terminal , and how to navigate through the linux file system. To understand more about the linux directory structure which is different from the windows directory tree, follow this nice writeup here.

If you’ve made it through to this line, congrats ! Try other flavours of linux, explore the options. Choose what is best for you and keep exploring more commands to make your tasks easier.

If you think this article helped you, follow my blog for more such interesting articles in the future. Have a great day !


Interfacing an absolute encoder with Raspberry Pi

Hi all !. I’m currently building a robot (details will be updated later) for which I will need position data from an absolute encoder. In this walkthrough, I will explain how to interface an absolute encoder with a Raspberry Pi 3.

The encoder i’m using will be this : mouser absolute encoder

An absolute encoder returns position data as ‘grey codes’, through a synchronous serial interface (SSI) protocol. We will use a raspberry pi to extract this data from the encoder and turn it into valuable position information.

The mouser EMS22A50 is a 1024 ppr absolute encoder whose datasheet is available here. We will receive the absolute position data from the encoder by programming the raspberry pi in python to communicate, following the Synchronous communication protocol. For simplicity of this tutorial, I have ignored checking parity bits. We will only extract the 10 bit data from this encoder.

bitsdata

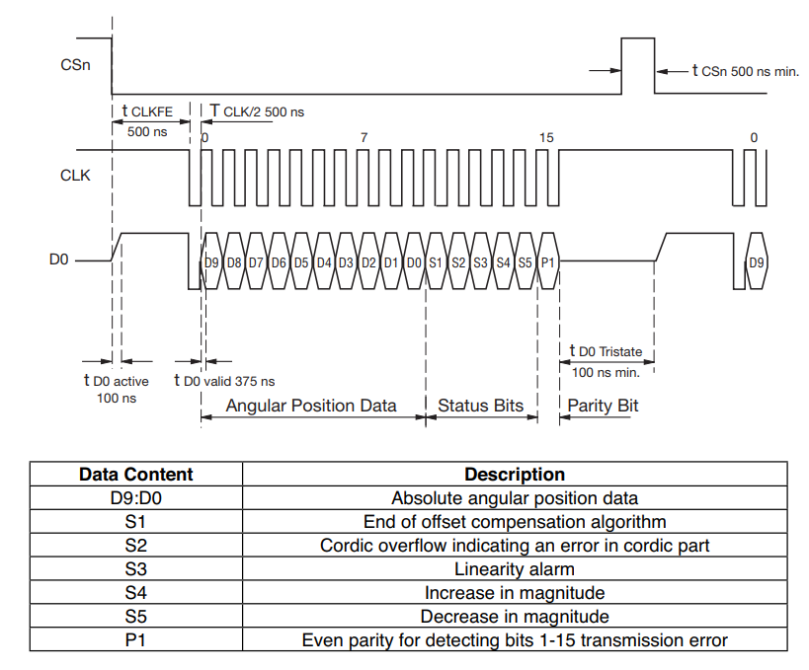
Above picture illustrates the output waveform from the DATA OUT pin of the encoder.

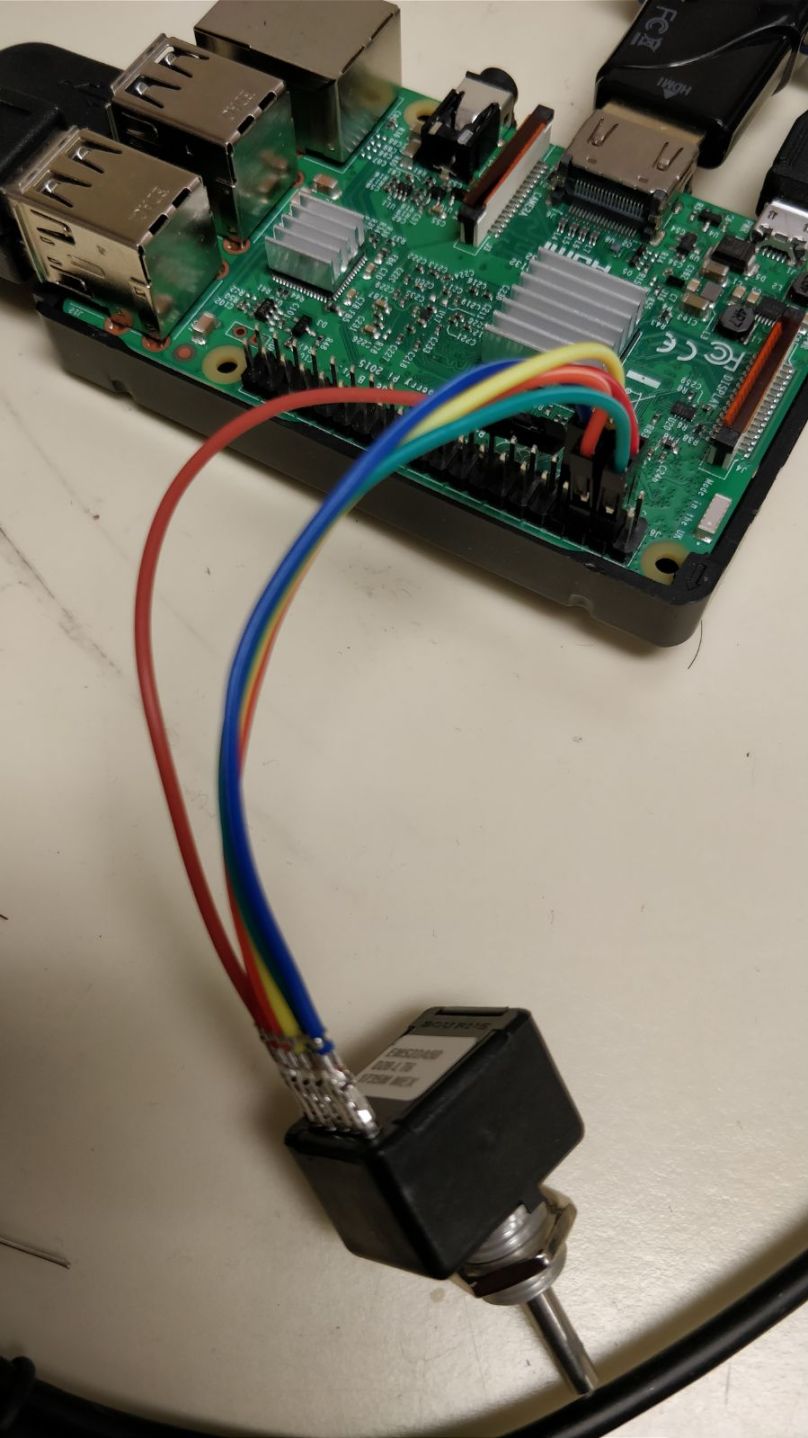
The EMS22A50 comes with a panel mount pin configuration, which means it cannot be mounted on a breadboard. We will follow this trick to interface this encoder with a raspberry pi : Take a female to female jumper wire. Pluck out the black strip out of one of the ends. Now plug in the metal connector into the encoder’s pins as shown in the picture below.

Your final setup should look like this :

img4

“Make things simple, but not simpler” – Einstein.

Follow the same wiring pattern as programmed in the Python script. The script for polling the encoder data can be found in my repository here.

I have removed delay between two clock edges because of the inherent delay in polling caused by the GPIO library in raspberry pi. Source : benchmark.

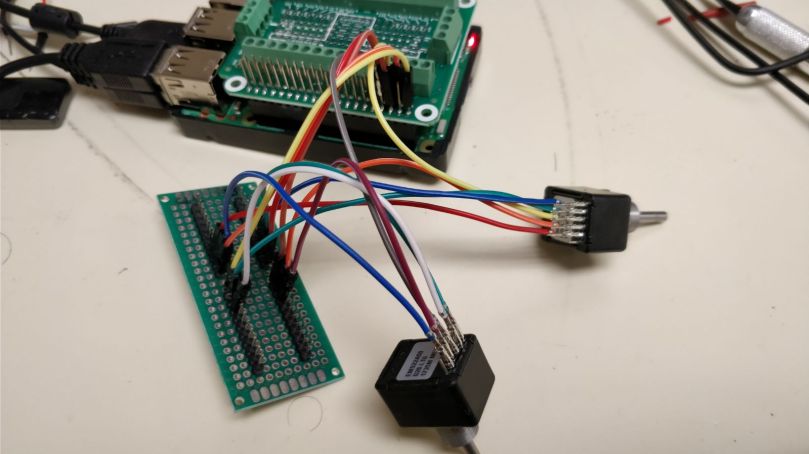
UPDATE : I have updated the code to attach several of these sensors to the raspberry pi. Just connect the pins as in the code. I soldered a GPB to branch out VCC, CLK, CS and GND, as shown in the pic below :

more


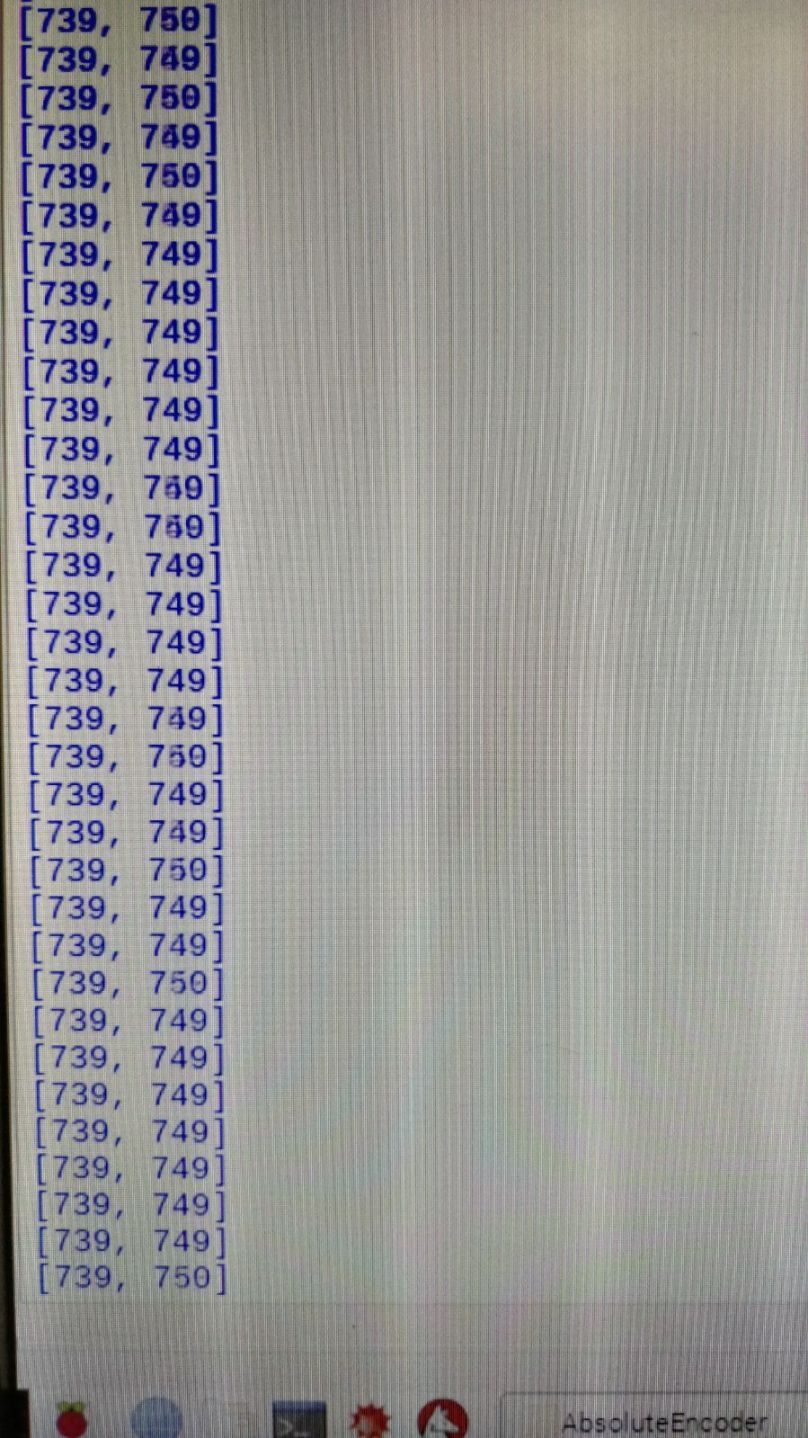
Results : values ranging from 0-1023 that maps linearly between 0-360 degrees.

results

Thanks for reading ! If you think this article helped you, follow my blog for more cool stuff. Need more help ? shoot me a mail !.

Build a cool zipper robot !

zipper

In the summer of 2017, I built this zipper robot using 2 motors and a 3D printer. As its name says, it’s a cool robot that can both zipup and unzip a zipper. You can build one for yourself as well. I have shared the design of this robot as a .stl file here.

Steps to build one :

1) 3D print the alterations.stl file using a 3D printer
2) Use any superglue (I used loctite) to affix a flat rubberband on the sides of the pulley as shown in the Fig. It helps increase grip by providing friction
3) Place the pulleys from the top of the robot (through the hole provided)
4) Insert the motors, axle through the holes of the pulley.
5) Power up the motors using a 3-5V 1A power supply and watch the robot in action !.

Video of its working : zipper robot

For the motors, I used  2 x Dc geared high torque motors from Amazon.

Connecting a Raspberry Pi 3 to Enterprise Wifi

raspi

It can be quite irritating that when you finally connect the essentials ( monitor, mouse and keyboard) to see the single board computer boot up , it does not connect to your University’s wifi network. This is because universities around the world use a different wifi protocol than your home network. It’s called an enterprise network and follows a different authentication protocol ( PEAP Protocol ).  Anyway, as engineers we are here to fix problems with the best solutions, so buckleup and follow the steps below to connect to the network of your choice !

This article assumes the Raspberry Pi 3 runs a raspbian flavour of linux. However, the steps mentioned should be common to any linux machine. We are going to edit the wpa_supplicant.conf file. A supplicant is an entity at one end of a P2P LAN connection that seeks to be authenticated by the other end. In this case, our raspberry pi is the supplicant seeking for authentication by the University’s PEAP network.

Lets edit the wpa_supplicant.conf file in /etc/wpa_supplicant/wpa_supplicant.conf

Type this in your terminal : sudo nano /etc/wpa_supplicant/wpa_supplicant.conf

Edit the contents of the file to the following :

network={
      ssid=""
      priority=1
      proto=RSN
      key_mgmt=WPA-EAP
      pairwise=CCMP
      auth_alg=OPEN
      eap=PEAP
      identity=""
      password=""
      phase1="peaplabel=0"
      phase2="auth=MSCHAPV2"
      }


Press Ctrl+O to save and Ctrl+X to exit.
Fill in the blanks ‘ssid’ with your University wifi’s ssid(name),  ‘identity’ with your username and ‘password’ with your password.

Hooray ! Now you’ve successfully configured your device to connect to your University’s wifi. Go ahead and restart your respberry pi and it should get connected just after the restart. Have Fun and don’t forget to let me know if this helps. 🙂